Pain…tension…restricted blood flow…inflexibility…
It’s amazing how frustrating these types of nagging problems can be. And especially if you’re physically active.
It’s hard to hit PRs when your hips or shoulders hurt and it’s hard to run or bike when your knees are always aching.
It can be equally hard to find out what’s going on and what to do about it, too.
A quick Google search will send you off in all directions ranging from acupuncture to chiropractic care to surgery.
Well, if you’re dealing with any of these problems, there’s a good chance that myofascial release therapy can help.
And the best part is it’s easy, inexpensive, and can be done at home with minimal equipment and time.
So, in this article, we’re going to cover all the bases:
- What myofascial release is
- How and why it works
- How to do it
By the end, you’re going to understand how to use myofascial release to relax tense muscles, improve blood and lympatic circulation, increase range of motion, reduce muscle soreness, and more.
What Is Myofascia?
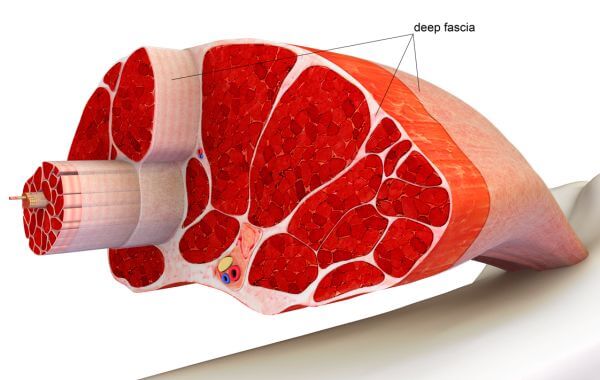
Myofascia (or just fascia, as it’s more commonly called), is a strong, flexible “net” of tissue that wraps around all your muscles and bones.
This net forms a continuous “body suit” that starts at the top of your head and goes all the way to your feet.
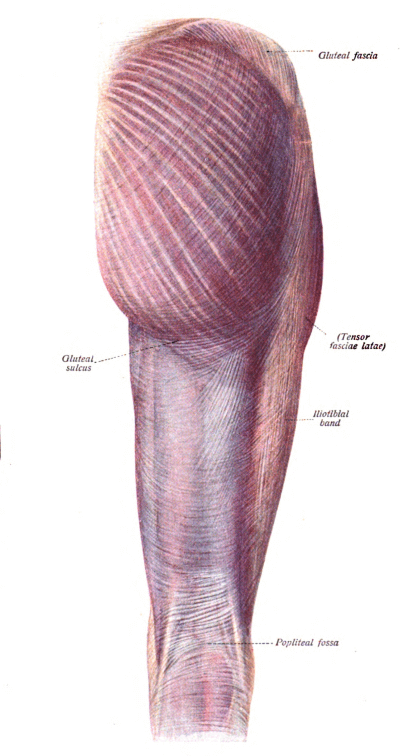
For example, here’s how the section of the fascia covering the back of your legs looks:
This yarn-like weave connects every part of your body to one another. And this means that when one area of the fascia becomes damaged or abnormally tight or torqued, it can cause negative effects in other areas of the body.
If the problem becomes severe or prolonged, the fascia can thicken, causing pain and further inflammation.
Now, when it’s healthy, fascia is soft and pliable, allowing for pain-free, unrestricted movement. Healthy fascia also helps prevent injury and maintain maximal strength and power.
If it loses its malleability, however, the resulting tightness, tension, and weakness can ripple throughout the body.
Common problems caused by damaged or tight fascia include:
- Headaches
- Muscle pain and spasms
- Back and neck pain
- Recurring injuries
- Reduced flexibility
- Poor posture
- And more…
And common reasons for fascia losing its suppleness include:
- Physical traumas such as falls, surgery, and sports injuries
- Intense physical activity
- Systemic inflammation (usually resulting from an unhealthy lifestyle)
- Poor posture
- Lack of stretching
- Prolonged sitting or standing
So, as you can see, what many people think are muscular or skeletal problems are actually myofascial problems. And they must be dealt with differently.
One of the most effective ways to do this is the subject of this article: myofascial release.


What Is Myofascial Release?

Myofascial release is a form of therapy that uses slow and sometimes deep pressure to stretch and elongate the fascia and thereby release stuck and tight tissues.
Research shows that, when used properly, myofascial release can reduce pain, tension, and fatigue, and improve blood and lymphatic flow, flexibility, and mobility.
There are two primary objectives in myofascial release therapy:
1. Finding and releasing trigger points.
Trigger points are tight spots in muscles that, when pressed on, produce pain that “refers” to other areas in the body (can be felt in areas other than where you’re applying pressure).
By holding pressure on these trigger points, your body will gradually relax the areas, causing the pain to fade. This is known as releasing trigger points.
2. Unsticking tissues.
When muscle and fascia tissue get “sticky,” your workouts and other physical activities can cause unusually high amounts of stress to be placed on various parts of the body.
In time, this can lead to a whole host of orthopedic issues.
There are several types of myofascial release techniques that you can use to accomplish these goals, including massage, foam rolling, soft tissue “smashing,” and Strain-Counterstrain therapy.
In this article, we’re going to focus on what you can do at home by yourself: self-massage, foam rolling, and ball massage (no, not that).
Effective Myofascial Release Technique #1:
Self-Massage

One of the major benefits of self-massage is it allows you to pinpoint specific regions of tissue that aren’t accessible with tools like balls and rollers.
It also allows you to feel the issues you’re working on and gauge how they’re releasing and changing. This is important because pain isn’t the only sign that an area needs attention–you should also be looking tissues that feel leathery, which is an indication that scar tissue has built up in the region.
(If you lift weights regularly, you’re probably going to have quite a bit of “sticky” scar tissue throughout your body.)
Now, you can massage just about any area of the body but I think self-massage is best suited to working your shoulders and shoulder blades.
These areas of the body are full of small tendons and muscles that dramatically impact your weightlifting performance, like the rotator cuff muscles and the tissues in the bicipital groove, and that are very hard to get at with tools like the foam roller and ball.
These videos show how to effectively massage these tissues:
Effective Myofascial Release Technique #2:
Foam Rolling
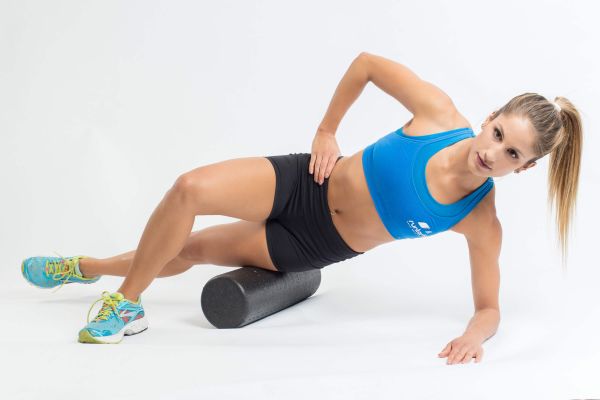
Foam rolling used to be a mysterious, “experimental” technique used solely by professional athletes, coaches, and therapists.
Well, thanks to years of technique development, and a bit of recent clinical research, foam rolling has become a common practice for people at all levels of fitness, and for good reason.
Mechanically speaking, foam rolling is very simple.
You position your body in certain ways on a foam cylindrical tube to put pressure on trigger points and regions of sticky, leathery tissues.
And what types of benefits can you expect from regular foam rolling?
Well…
- A study conducted by scientists at Memorial University of Newfoundland found that foam rolling increases range of motion without decreasing strength (which is a problem with pre-workout stretching).
- A study conducted by researchers at Osaka Aoyama University found that foam rolling reduces arterial stiffness and thus improves blood flow.
Better blood flow means better removal of metabolic waste from tissues and better delivery of nutrients, which ultimately helps with muscle recovery and repair.
We can see these effects in a study that demonstrated that foam rolling reduces the severity of delayed-onset muscle soreness (DOMS) that occurs after training, and increases range of motion.
Furthermore, due to the fact that foam rolling doesn’t seem to impair performance, you can roll before a workout to prime your body for the training.
Now, if you want to start foam rolling, the first thing you’re going to need is a good roller.
Choosing a Foam Roller
The roller I use is the blue (original density) “Rumble Roller.”
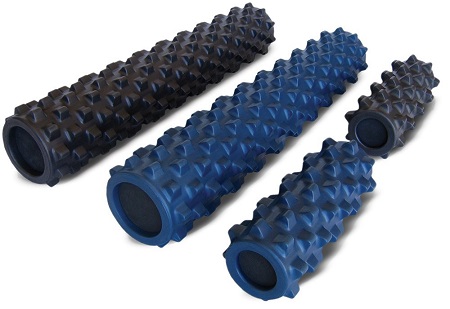
Although it’s more expensive than a plain high-density roller, I like it quite a bit more.
I find the Rumble Roller more forgiving because the harder the roller is, the less pressure you can apply before it begins to really hurt, and the knobs are great for digging into smaller tight spots.
Choosing Foam Rolling Exercises
Like with lifting, there are a lot of foam rolling exercises you could do, but I’ve found the following five particularly helpful.
You can perform these exercise pre-workout to improve performance, or post-workout to improve recovery, or both.
In terms of time, I like to spend a couple minutes on each exercise, finding and releasing 1 to 2 trigger points before moving on to the next.
How to Foam Roll the Iliotibial Tract (IT Band)
The “IT Band” runs along the outer side of your leg, and its associated muscles are involved in various hip movements, and the stabilization of the knees.
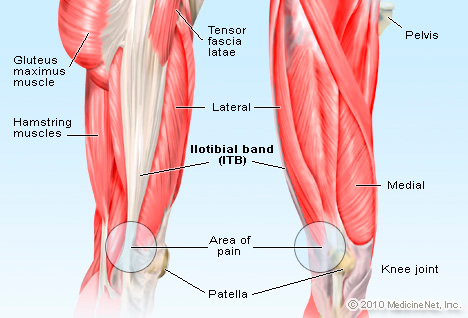
Here’s how to foam roll the IT Band:
How to Foam Roll the Hamstrings
Tight hamstrings are a curse for squatting and deadlifting, and foam rolling can really help.
Here’s how to do it:
How to Foam Roll the Quadriceps
I know firsthand how insidious myofascial problems around the quadriceps can be.
If tissues get too locked up, it can prevent the four muscles that comprise the quads from fully contracting during an exercise like the squat.
This, in turn, means that the smaller stabilizing muscles in the hips have to work extra hard. And, in my case, this caused them to get quite aggravated.
Well, the following foam roller exercise can help you avoid this problem:
How to Foam Roll the Rhomboids
The rhomboids (major and minor) are back muscles that connect your shoulder blades with your spine, and are activated to retract the shoulder blades.
Here’s how it looks:
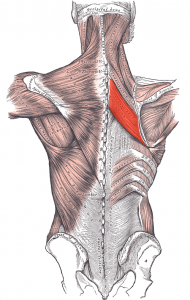
The rhomboids are heavily involved in back training and can also get quite stiff from prolonged sitting.
Here’s a great way to release tension in these muscles:
Latissimus Dorsi Foam Roller Exercise
You probably know the latissimus dorsi, or “lat,” but here it is in case you don’t:
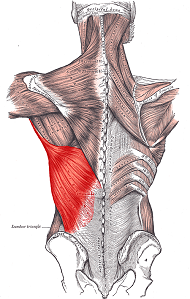
Due to how hard they have to work in both back and chest training, it’s common for trigger points to develop.
Here’s the foam roller exercise for it:
Effective Myofascial Release Technique #3:
Ball Massage
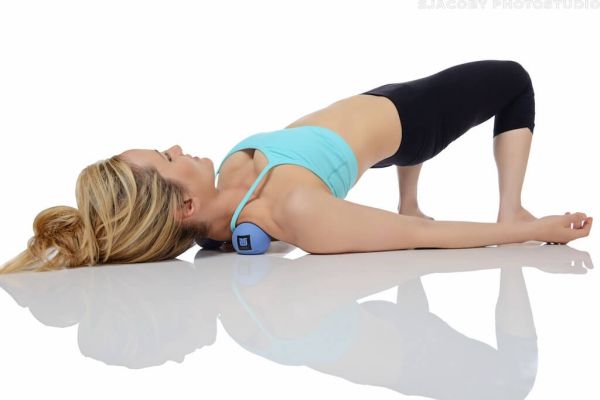
Settle down fellas…I’m talking about using this…
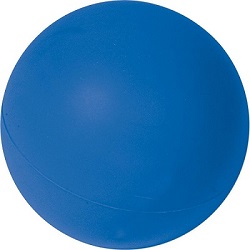
…to inflict pain on yourself.
The great thing about using a ball to dig into tissues is it allows you to nail knotty muscles and tissues that you can’t quite target with the foam roller.
Like with self-massage, the ball is particularly well suited to the upper body, but it has several great lower body uses as well.
Here are my favorite ball exercises:
How Frequently Should You Do Myofascial Release?

This depends on how you train.
The general rule is the more intense your training is, the more you can benefit from myofascial work.
Many people find that one to two sessions of myofascial release for each heavy training session works extremely well.
So, for instance, immediately after a heavy deadlifting workout (when everything is warm and stretchy), you’d do 5 to 10 minutes of myofascial release on the posterior chain.
You’d also work the soft tissues of the chest and shoulders after a heavy bench press workout, but ideally, you’d do another session one to two days later as well.
(Your chest and shoulders can benefit from more attention than your posterior chain.)
If you don’t have the time or patience to do that much myofascial work, or can’t do it immediately after your workouts, don’t despair.
If you start with doing one session per major muscle group per week, and do them whenever you can, you will still see marked improvements in your body.
And if your workouts mainly involve body weight movements or lighter weightlifting, this lighter frequency should be sufficient for you.
The Bottom Line on Myofascial Release

Myofascial release isn’t necessarily fun or “sexy” like training is.
It’s one of those habits that can be hard to make stick.
Remember, though, that putting time and effort into it is like taking your vitamins.
It’s a long play and an “insurance policy” against future disease and dysfunction.
Make time for it and Future You will be thankful.
What’s your take on myofascial release? Have anything else to share? Let me know in the comments below!
+ Scientific References
- Bradbury-Squires, D. J., Noftall, J. C., Sullivan, K. M., Behm, D. G., Power, K. E., & Button, D. C. (2015). Roller-massager application to the quadriceps and knee-joint range of motion and neuromuscular efficiency during a lunge. Journal of Athletic Training, 50(2), 133–140. https://doi.org/10.4085/1062-6050-49.5.03
- Okamoto, T., Masuhara, M., & Ikuta, K. (2014). Acute effects of self-myofascial release using a foam roller on arterial function. Journal of Strength and Conditioning Research, 28(1), 69–73. https://doi.org/10.1519/JSC.0b013e31829480f5
- MacDonald, G. Z., Penney, M. D. H., Mullaley, M. E., Cuconato, A. L., Drake, C. D. J., Behm, D. G., & Button, D. C. (2013). An acute bout of self-myofascial release increases range of motion without a subsequent decrease in muscle activation or force. Journal of Strength and Conditioning Research, 27(3), 812–821. https://doi.org/10.1519/JSC.0b013e31825c2bc1
- Schleip, R. (2003). Fascial plasticity - A new neurobiological explanation: Part 1. In Journal of Bodywork and Movement Therapies (Vol. 7, Issue 1, pp. 11–19). Churchill Livingstone. https://doi.org/10.1016/S1360-8592(02)00067-0
- Ajimsha, M. S., Al-Mudahka, N. R., & Al-Madzhar, J. A. (2015). Effectiveness of myofascial release: Systematic review of randomized controlled trials. Journal of Bodywork and Movement Therapies, 19(1), 102–112. https://doi.org/10.1016/j.jbmt.2014.06.001
- Langevin, H. M., Stevens-Tuttle, D., Fox, J. R., Badger, G. J., Bouffard, N. A., Krag, M. H., Wu, J., & Henry, S. M. (2009). Ultrasound evidence of altered lumbar connective tissue structure in human subjects with chronic low back pain. BMC Musculoskeletal Disorders, 10(1). https://doi.org/10.1186/1471-2474-10-151